Showing posts with label Shirley's Home. Show all posts

Saturday, April 11, 2015

Entry Way Project Ideas {Shirley's Home}

In an attempt to redecorate my mom's entry way, I've come up with a few design ideas, but am struggling to decide which one would look best in her home. 

The wall color was recently painted Behr Marquee White Lie. 


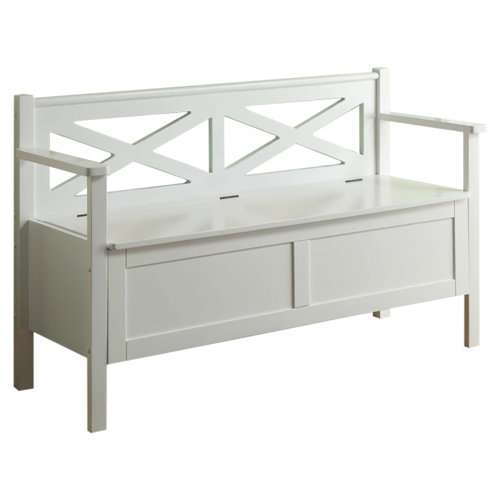
I also purchased a bench for the entry room from Wayfair.com for a great price.

Monarch Specialties Bench with Storage 


But other than that, there is nothing really in that room or anything that I feel is really crucial and needs to be in that room. Here are some ideas of what I am thinking would work well with the fresh paint and new bench.

Thursday, April 9, 2015

Kitchen Makeover Part 2

In my last post, Kitchen Makeover Part 1, we painted the oak cabinets that had come in the house when my parent's purchased it. However, we had only painted the bottom cabinets. Before painting the top cabinets we wanted to paint the walls to get clean line around the cabinets when we taped them.

The walls, as I had mentioned in the last kitchen makeover post, were some awful tint of orange. 
We decided to paint the main wall in the dining area white to brighten the room since the wall would reflect the natural light coming in from the sliding glass door. On the rest of the walls in the dining area/kitchen, we thought a light gray would be a nice neutral color {other than white} that would reflect a good light in the room. 

The white wall we painted in Behr Ultra Pure White in a satin finish. 

For the gray walls we chose Behr Sterling in satin. 

Once again, it's amazing what a little paint can do. 

I won't show you the walls until the cabinets and all the other little details are complete, but here's a little preview. It's the coffee corner were working on {its not complete yet still has a few details to add}


Stay tuned for the complete Kitchen Makeover reveal! 

http://lianachristine.blogspot.com/2015/04/kitchen-makeover-part-1-kitchen-cabinets.html?m=1

Saturday, April 4, 2015

Kitchen Makeover Plans


We recently painted the cabinets in the kitchen and they are looking AMAZING! However, now that the cabinets are bright white {painted with Behr Marquee Ultra Pure White} everything else in the kitchen is looking a little dull and yellow aka dirty. I have starting planning for the kitchen renovation and here is what I have come up with.

Friday, April 3, 2015

Kitchen Makeover Part 1 {The Kitchen Cabinets}


I recently started yet another project at my parent’s house. This one I am super excited about and have been wanting to tackle for a while… THE KITCHEN CABINETS! While some people may enjoy the look of oak cabinets, my mom and I do not. I’m glad we were both on the same page about wanting to see them gone. Like many other rooms in the house, the cabinets were giving off that dreaded orange tint, which made the room look small and yellow. Long story short, they had to go.
11096539_682976625144397_2443925508539618350_n
Rather than buy new cabinets, to replace the standard oak cabinet that came with the house, we decided to paint them. This project wasn’t too challenging considering my mom had painted the kitchen cabinets in two of her previous homes, so it was safe to say she had it down like a pro.
The first step was to remove all the cabinets and hardware from each cabinet door.

Once all the cabinet doors were removed it was time to sand down the doors and the frames. Originally I had tried to skip this step on the frames of the cabinets. I soon found out that taking shortcuts during a project like this one was not a good idea. The paint quickly began to appear clumpy and the residual oil left on the cabinets that cleaner could not remove was creating an oil affect. In other words SANDING IS 100% NECESSARY!
Once the sanding was complete we began to paint the frames of the cabinets.We used a small paint brush for all the edges and small corners and then a foam roller for the rest.
To keep things simple, and to make the cabinets last through the home decor trends of time, we decided to paint the cabinets white, using Behr Marquee Ultra Pure White in satin. Because we used Behr Marquee, which has paint and primer in one, we didn't prime the cabinets. In the previous cabinet painting products my mom had done, she had never primed before painting and the paint held up fine.
1907519_682976971811029_4049795246939018377_n
{you may want to prime your cabinets before beginning to paint them with the color of choice. My mom has painted kitchen cabinets twice before and has never primed them and they have held up fine, but if your cabinets will receive a lot of love aka wear and tear, then you should not skip priming}
img_1935img_1937
It is important to use a foam roller to ensure the paint goes on smoothly and evenly without leaving any sort of unwanted textures.
img_1876


We’ve only painted the bottom cabinets so far, but stay tuned for the before and after once we’ve finished painting ALL the cabinets in the kitchen! I’m so excited!

Paint Colors in this Post:
Behr Marquee Ultra Pure White

Wednesday, April 1, 2015

Guest Bath Makeover


After making over my moms middle floor half bath, I decided to tackle another one of the bathrooms in her house. The walls and the ceiling were painted with a orange beige color which made the room look small and gave off a nasty yellow light.
I decided to paint the walls and the ceiling white to make the bathroom feel larger and to eliminate the awful yellow lighting. I also painted the baseboards and molding with a fresh coat of paint.


I painted the walls Behr Marquee Ultra Pure White. Literally I just picked a can of the Behr Marquee paint in a Satin finish up off the shelf, no color mixing necessary. I did the same thing with the Semi Gloss paint which I also got in Ultra Pure White.
For the cabinet I got Behr Celtic Gray. I only needed a tester size to fully paint the cabinets which was awesome and saved me a lot of money.
It’s amazing what a little paint can do.
Here is the before picture of the cabinet
And here is the after
Painting the walls and the ceiling a bright white really had a huge impact on the feel of the room. It looks much cleaner and larger than before and I couldn’t be more pleased with out it turned out!
The shower curtain is Cynthia Rowley and was purchased from Home Goods for only $16.99!
The next step to finish up this bathroom makeover will be to add a little color to the bathroom with some coral towels.
Coral Towels from The Company Store

Sunday, March 22, 2015

Half Bath Makeover

When my parents moved into the townhouse they live in now, the house was in decent condition. There were just things here and there that desperately needed a makeover. The one room in the house that I felt needed it the most was the half bath on the middle floor. Not only was the room reflecting a hideous shade of orange from the paint the previous owners had chosen, but it also was very dingy and dirty.